Saturday, 5 April 2014

Sweet Pastel Easter Brunch


Hands up if you love Easter! Well I know I do and let's be honest, it's an excuse to eat all the chocolate you want without being judged :)

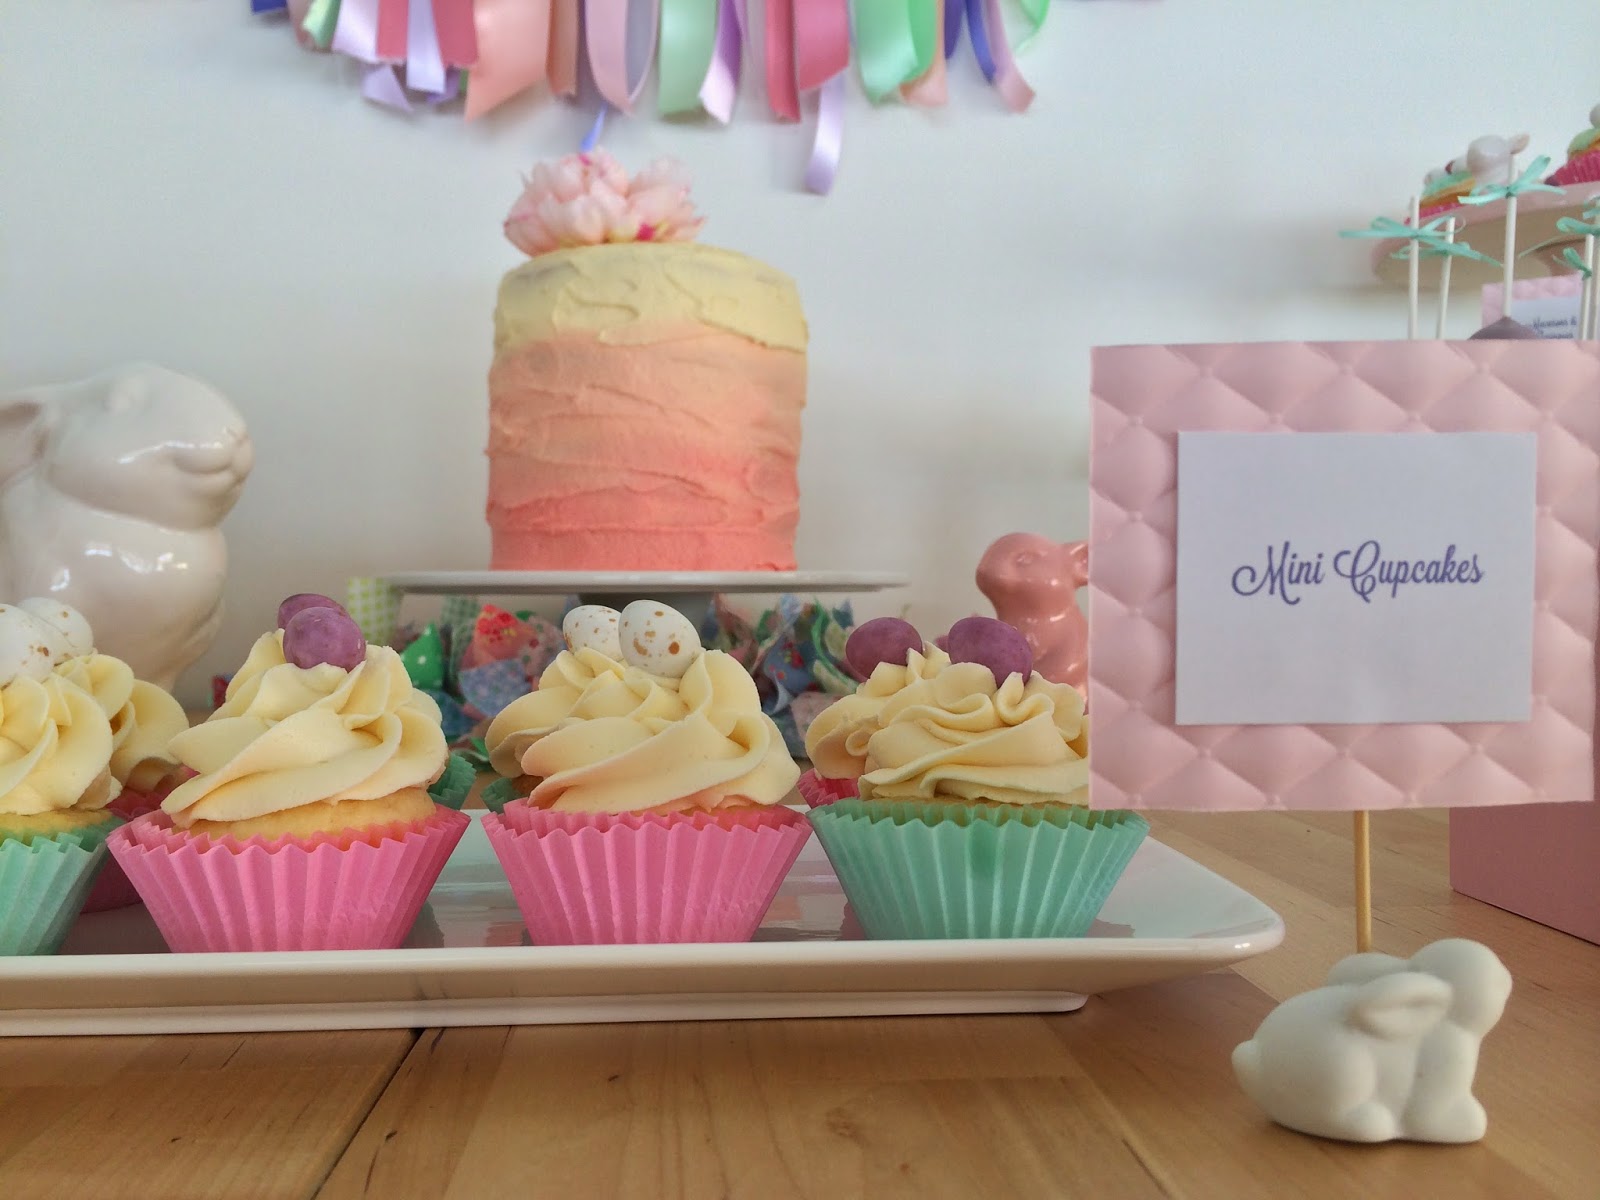
This fun pastel Easter dessert buffet was inspired by my current love of pastels and ribbon! I wanted to create a dessert buffet which would incorporate gorgeous ribbons in a range of fun colours but also have that soft, girly look. The main colours for the table are pink, mint greens, lilac and a pop of periwinkle! I made the backdrop from strips of ribbon tired onto a piece of rope - I really love how this makes the table and pulls everything together. The printable food tags have a gorgeous pale pink background from the lovely Cristina Re line, which I attached to mini bunnies as stands. I placed a few ceramic bunnies around the table to ensure the Easter 'look' was present.


There is nothing more fun than coloured food! I ensured the colours were incorporated in all the foods to tie it altogether. The main cake is a 3 tier sponge cake with a rough ombre look topped with a gorgeous flower. Push pops in mint and lilac as well as cake pops brought height to the table and were super tasty! Little nest cupcakes with mini easter eggs (large and small - lets be honest, you can never have enough cupcakes), white chocolate mousse with cute little bunny spoons tied with a gorgeous purple stripped ribbon, yummy macarons and mini meringues finished off the dessert table perfectly.


Hope you can grab some inspiration from this little dessert buffet and create something for your family and friends this Easter! Enjoy and eat lots of chocolate :)




Sunday, 16 March 2014

Sweets: 'St Patricks Day' Baileys Irish Cream Cupcakes


Baileys Irish Cream Cupcakes
(18 cupcakes)

- 1 2/3 cups plain flour

- 1 tsp baking soda
- 1/2 tsp baking powder
- 1 cup sugar
- 1 1/4 cups boiling water
- 3/4 cup unsweetened cocoa
- 1/4 cup Baileys Irish Cream
- 120 gms unsalted softened butter
- 2 large eggs 
1 tsp vanilla extract

Baileys Irish Cream Buttercream


- 250 gms unsalted butter

- 1 tsp vanilla extract
- 2 tbsp milk
- 4 cups icing sugar
- 4 tbsp Baileys Irish Cream
- Pinch of salt

Method:

1. Preheat oven to 170°C and line 2 muffin pans with baking cups.  Place boiling water, Baileys and cocoa in a small bowl and stir until combined; set aside for later use.


2. In a large bowl, beat sugar, butter, and vanilla extract at medium speed until fluffy and creamy. Add the eggs and beat well until combined.

3. Mix flour, baking soda, baking powder, and salt in a medium bowl. Add the flour mixture to butter mixture and beat until combined. Add the cocoa mixture and beat until just combined.


4. Fill each baking cup 1/4 inch below the top of the liner. Bake cupcakes for about 15 minutes or until a toothpick inserted in the center comes out clean. Remove cupcakes from tray and place on a wire rack to cool.

4. Beat butter in a large bowl on medium speed until light and fluffy (about 4 minutes). Reduce speed to low; add the rest of the ingredients. Increase speed to medium and mix for 6 minutes until light and fluffy.

5. Fit a piping bag with a decorative tip of your choice and pipe away!

Note: I crumbled a cupcake into the buttercream to give it some texture, you don't need to do this if you don't want to :)


Monday, 3 February 2014

Sweets: Cookie Dough Cupcakes


On Sunday I had massive craving for Ben and Jerry's cookie dough ice-cream, but I really didn't want to have to venture out of the apartment to go hunt some of it down (seriously why is it so scarce in Perth?!), so I decided I could whip something up just as delicious with ingredients I already had in my pantry.

I give you, I quote from my husband, 'the best cupcakes I've ever eaten'.


I hope you enjoy this yummy cupcake recipe with the awesome cookie dough centre!


Saturday, 18 January 2014

Sweets: Ombre White Chocolate covered Red Velvet Cake Balls


Does anyone else love cake that's really dense? You know, the kind where you have some and feel full and satisfied instantly?

Well let I know I do! There's something about eating smaller portions of cake that I like - It's like your eating so little yet your so satisfied so you don't feel like you have to run 10 kms to get rid of the calories!

These Red Velvet Cake Balls are some of my favourite sweets of all time! I made these recently and wanted to take them to work for everyone to have a try, but mysteriously over the weekend they all disappeared….. in mine and my hubby bellies :)

These will make a great Valentines Day gift or a perfect addition to a dessert bar - I know I'll be making some for Valentines Day - you should too!


Sunday, 12 January 2014

Eats: Salad Jars


Do you ever feel that making lunches for work gets so boring and repetitive after a while? I know it does for me, so a lot of the time I just buy my lunches and lets be honest, not only is buying your lunch everyday expensive, but you tend to make unhealthy food choices just because it's quicker and easier. These salad jars are a perfect lunch option, the flavours are endless and they keep fresh and tasty in the fridge for up to 8 days.

Now I'm not a salad eater myself, never have been, probably never will be - I know you think I'm crazy, I think I am too.  I've just never been able to eat it, it's the texture that puts me right off.  Anyway, this post isn't about my lack of salad eating ways, it's about my husbands LOVE for salad!

So I decided it would be nice for him to have some healthy and YUMMY salads for lunch! Since he isn't a big lunch eater, I know something rather small but substantial will go down great.

I was definitely inspired to whip up some yummy salads after reading Amy's post over HERE, she has some great recipes which look delicious!

So here are three recipes for salads in-a-jar, which are super easy to make and taste great too - according to my husband anyway :-P


Mexican chickpea salad with chilli/lime dressing
(Makes 4 jars)

Ingredients for salad
- Cooked brown rice
- Cooked chickpeas
- Salsa
- Red onion, chopped
- Grape tomatoes, halved
- Coriander, finely chopped
- Baby spinach leaves

Chilli/lime dressing (quantities per jar)
- 2 tablespoons olive oil
- 2 tablespoons fresh lime juice
- 1 teaspoon crushed cumin seeds (powder)
- Sprinkle of red pepper flakes
- Salt and pepper

Method
1. Combine all your ingredients for the chilli/lime dressing into your jars, screw lids on, shake to combine.
2. Start building your salad component. You want to start with the ingredients which will absorb the dressing well, so I started with the following:
- Cooked brown rice
- Salsa
- Cooked chickpeas
- Red onion
- Tomatoes
- Coriander
- Lastly, pack in the spinach leaves


Cobb Salad
(Makes 4 jars)

Ingredients for salad
- Baby spinach leaves
- Grape tomatoes, halved
- 1 avocado, sliced
- 4 to 6 hard boiled eggs, sliced
- Meat of your choice, turkey or chicken
- Cheese, grated

Balsamic dressing (quantities per jar)
- 2 tablespoons olive oil
- 1 tablespoon balsamic vinegar
- Salt and pepper

Method
1. Combine all your ingredients for the balsamic dressing into your jars, screw lids on, shake to combine.
2. Start building your salad component. I started with the following:
- Tomatoes
- Avocado
- Egg
- You can put the meat here, I didn't use meat
- Spinach
- Lastly, sprinkle some cheese on top


Caesar salad with bacon - add cooked chicken if you wish
(Makes 4 jars)

Ingredients
- Cos lettuce leaves
- 4 to 6 hard boiled eggs, sliced
- Cooked bacon pieces
- Croutons
- Parmesan, shaved
- Caesar dressing

Method
1. Place a small amount of the caesar dressing in the base of your jar, DON'T shake!
2. Start building your salad component. I started with the following:
- Eggs
- Bacon
- Croutons
- Lettuce leaves
- Lastly, sprinkle parmesan on top


Notes:
- You want to ensure that the greenery is always on the top, away from the dressing otherwise it will just turn soggy.
- For best taste, tip your jar into a bowl once your ready to eat to enjoy all the wonderful flavours!


I hope you have fun creating some salads in jars - please let me know if you have some recipes, I'd love to try them out!

Thanks so much for stopping by xx


Wednesday, 8 January 2014

DIY: Balloon Tassel Garland


I've been spending a lot of time thinking of decorations for some upcoming parties I plan on throwing this year  (crazy party brain) and where other than Etsy would I source some beautiful items. Now, I've always been a fan of the big round balloons, you know the type that everyone has in their engagement photos and wedding shoots, but I never actually wanted them for my own wedding…. I regret that now - I have one in my apartment right now and it's so much fun! I know, I know, I sound a bit insane saying that the balloon is fun, trust me, it  makes you feel like a little kid again, escorting your balloon around with you.


Now, team that wonderful balloon with a pretty garland and you have wow factor! So with a vision in mind, off to Etsy I trotted to purchase these pieces of amazement. Well let me tell you, I was not impressed with the price tag… I mean if your purchasing a few of these, it definitely adds up. Now I totally understand that people make and sell these as their source of income and what not, which I think is totally awesome (and trust me, they take a long time to make, so the cost is definitely in the labour), but it's something I thought I could try my hand to, so that's what I did. If you would like to find out how to make this pretty garland, whether you require for a wedding, baby shower or you simply just want to have it hanging out in your living room like an old friend (like I do), then read on!

Supplies

- Plastic tablecloths in your preferred colours (I used half of a white and half of a gold tablecloth) - I picked mine up from Spotlight for just over $2 each!
- Strong string, ribbon or rope (If the balloon is going to be filled with helium, you'll need something strong)
- Scissors
- Stapler
- Sticky tape
- 36" round balloon in your preferred colour

How to make

1. First your going to take your table cloth and open it out fully, then your going to fold it horizontally and cut the loop at the end.
2. Then take your scissors, and cut straight down the middle to the end (see the picture below).
3. You'll now have 2 separate pieces (see below), now start cutting the sections into 15cm pieces.
4. Take your 15cm pieces and fold them in half so that the top on the plastic isn't open and creates a loop (see picture below).
5. Now start cutting strips into the plastic as pictured below, leaving a 1 inch space at the top where you don't cut (leaving the loop).
6. Once you have cut all the strips, start rolling the strips into each other, until you have a little bundle like shown below - staple to secure.
7. Now do a trillion more of them - have fun!

Once you have finished all of the tassels, you are now ready to construct to your balloon!


8. Tie your string to the base of the balloon (I used a white ribbon).

9. Now start attaching your tassels down the string, securing with clear sticking tape.
10. Mix up the colours as you go and space them out about 10 cms apart.
11. Be sure to fluff the tassels as you go, cover and overlap the sticking tape.
12. Now take a bunch of photos and act like a kid again!


I hope you enjoyed this little DIY and if you have any questions, please ask - my instructions are quiet vague and confusing I know - sorry about that!